
Taking photos on your iPhone is very convenient nowadays as they offer great quality and you can easily fit thousands of photos on there.
iPhones are great for taking high quality photos and pictures but when it comes to viewing them, the screen is way too small. You spend more time squinting at your phone and zooming in than actually looking at the picture in all its glory.
iPads on the other hand are perfect for viewing photos thanks to their large screen which makes it super easy. The only problem with iPads is the size, they are so big it's not ideal to carry them around to take pictures.
If you own both an iPhone and iPad then you’ll be amazed at how easy it is to transfer your pictures from your iPhone over. The simple process can be used by any generation iPad or iPhone and will only take a few minutes to transfer all your photos over.
So how exactly do you transfer your photos from your iPhone to your iPad? Especially if you have hundreds (or thousands!) of pictures?
We’ll cover 3 simple and easy ways in how you can get all your beloved iPhone photos transferred to your iPad. If you hate technology then don’t worry all these steps are easy to follow and there’s nothing complicated.
Method 1: Transfer iPhone Photos Using AnyTrans
If you’re planning on transferring hundreds and hundreds of photos from your iPhone to your iPad then this is the best way to do it.
The first step is to go to the AnyTrans website and download either the Windows or MAC version depending what computer you are using.
Once you’ve installed the software simply launch it on your computer and make sure both your iPad and iPhone are connected. If you check the top of the program you should notice there is a tab for each of your devices like in the picture below.
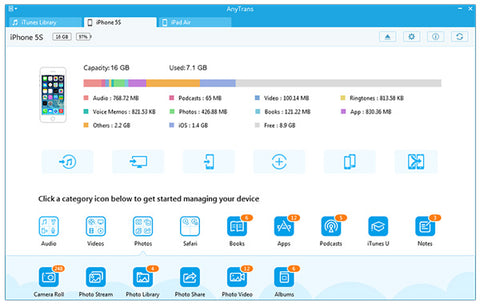
To transfer your photos over simply click on the homepage of AnyTrans and select photos. Once you have clicked that you will then be asked to select the photo album you want to transfer. You can then either select individual photos or choose to to transfer the whole album. Once you have the photos or album selected click to device button.
![]()
This will transfer all your selected photos from your iPhone over to your iPad. If you want a fast way transfer all photos from your iPhone to iPad then be sure try the one-click media import button on the homepage.
This feature will auto transfer all media files, including photos and music from one device to another with a click of the button. Perfect for those not too tech savvy users.
Method 2: Transfer iPhone Photos Using Photo Stream
If you don't have a computer on hand to use or you find them too confusing, then dont worry there are other ways to transfer your photos.
This second method makes use of Apple's iCloud feature and doesn’t require any connection to a computer. To use this feature it’s important to make sure you have WiFi enabled as you'll be transferring a lot of data over your internet.
Once you’ve selected what photo’s you want to upload to iCloud you’ll be able to access them on any other iOS device such as your iPad.
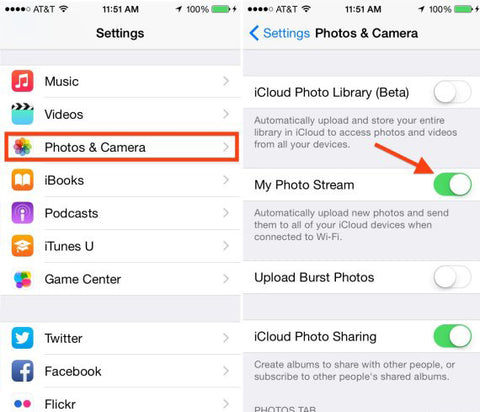
To enable the iCloud feature on your iPhone open the settings cog and click the iCloud option. Make sure you are logged in with your Apple ID and select Photos & Camera from from the settings menu. You should see a My Photo Stream toggle button, make sure it is green and enabled.
To complete the process make sure you follow the same steps on your iPad so the feature is enabled on both devices.
Once enabled on both iCloud will automatically upload your most recent photos so you can view them on all of your devices. To view the pictures simply access the all photos tab in the photos app and they will all be displayed.
Method 3: Transfer iPhone Photos Using AirDrop
If you happen to have an iPhone 5 or later then you can also use the AirDrop feature on versions of iOS 7 or newer. This method is perfect if you just looking to transfer 1 or 2 pictures without the hassle of having to go through loads of complicated options and settings.
To enable AirDrop open the control centre on both your iPhone and iPad by swiping up on your device. On the control centre screen tap on the AirDrop button and choose everyone.

Now you’ve enabled the AirDrop feature, head over to the photos app and select the photos you want to transfer. Once you’ve selected the photos press the share button on the bottom left of the screen.
A new screen should pop up showing your iPad's name, click to share the selected photos with the device. Now if you jump over to your iPad you should see a screen telling you your iPhone is requesting to send over some photos. Simply click accept the transfer and the photos will begin transferring.

If you are planning on transferring hundreds of photos from your iPhone to iPad then this probably isn't the most efficient method. We would suggest using either method 1 or 2 as it’s much easier to transfer larger quantities of photos.
Show Off Your Pictures
Now you’ve transferred all your prized photos over to your iPad, it’s time to sit back and enjoy the slideshow with your family and friends.
Why spend hours holding a tablet that can cause damage to your wrists when you can simply use a tablet stand instead?
The iBeani is the ultimate universal tablet stand that can be used with any tablet including mobile devices. Thanks to its unique design the iBeani can hold your devices securely on any surface including your lap!
Available in a range of different colours and patterns the iBeani is the perfect gift for any avid tablet user. Be sure to visit our store below to view our wide collection.